
allshop.ng User Manual
Everything allshop.ng does, from your first sale to the kitchen screen, explained step by step with pictures of the real app. Every screenshot is a demo shop, Mama Ada Supermarket in Ikeja, with real Nigerian products and six weeks of sales.
New to allshop.ng?
Create your shop, add products and make your first sale. About ten minutes.
Cashier
Sign in with your PIN, sell, take payment and print receipts.
Owner or manager
Storekeeper
New in this edition
- Snap a delivery: photograph a supplier's receipt to add stock
- HD QR menu posters in six styles, shared as a picture
- Kitchen screen for restaurants and bars
- Bakery & kitchen production
- Barcode stickers and moving stock between shops
- Stock Advisor: what to buy this week
- Change owed and split payments
- Pickup codes and online payments on the menu
- 2-step login and new-device alerts
- QuickBooks and accountant files
Create your shop, sign in, and find your way around.
Create your account and shop
Sign up in about a minute, then four things to do in your first ten minutes.
allshop.ng runs in the browser on any phone, tablet or computer. There is nothing to buy or install first, and you get 30 days free with no card.
- 1Open allshop.ng/app.html and tap Create a free accountOn a phone, tablet or computer. Chrome, Edge, Safari and Firefox all work.
- 2Fill in your detailsYour name, your shop name, the type of shop (General Retail, Pharmacy, Bar / Drinks Lounge, Wholesale, Phone Accessories), your email, your phone number and a password you will remember.
- 3Open More details if you have a referral codeIf someone shared their allshop.ng link with you, the code is filled in for you. Also say how you heard about allshop.ng.
- 4Tap Create accountYou land on the Dashboard of your new shop, ready to add products.
Your first ten minutes
- Check your shop details: SettingsShop details. Add the address and phone that should print on receipts, and the VAT rate if you charge VAT.
- Add your products: see Adding products. Scanning barcodes is fastest.
- Add your staff with their own PINs: see Staff, PINs and permissions.
- Make a test sale and print a receipt: see The Sell screen.
Signing in: owners, staff PINs and offline
Owners use a password; staff use the shop code and a PIN; anyone can open the shop offline on a device they used before.
Owners and managers sign in with their email or phone number and password. Cashiers and other staff use the shop code and a 4-digit PIN, so nobody has to share the owner's password.
| Way to sign in | Who it is for | How |
|---|---|---|
| Email or phone + password | Owner, manager | Type them on the sign-in page. Tick Remember this device on your own phone. |
| Staff PIN | Cashier, storekeeper, bar staff, chef, pharmacist | Other ways to sign in › Staff PIN. Type the shop code (for example 50CFAE1D) and your PIN. |
| Continue offline | Anyone who signed in on this device before | No internet? Other ways to sign in › Continue offline opens the shop with what this device already has. |
Forgot your password? Tap Forgot password? on the sign-in page and follow the link sent to your email. For extra protection, turn on 2-step login.
The till: products, payment, receipts, refunds, tabs, the kitchen and the cash drawer.
The Sell screen
Find products by tapping, searching or scanning, set quantities, sell by the piece, the carton or the kg, and pick the customer.
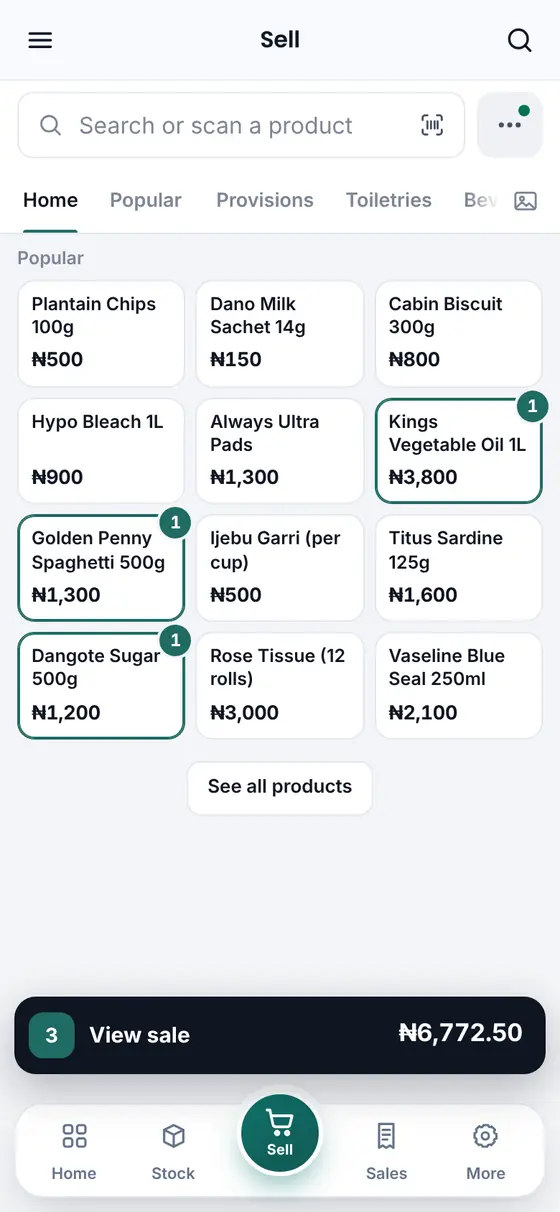
Adding products to a sale
- Tap a product on the Home or Popular tab, or open a category. A badge shows how many are in the sale.
- Search: type part of the name, the SKU or the barcode in Search or scan a product. Press F1 or / to jump there.
- Scan: a USB or Bluetooth scanner works straight away. On a phone, tap the scan icon in the search box to use the camera.
- See all products shows the full list when a product is not on the Home tab.
In the sale, use − and + to change the quantity and ✕ to remove a line. At the top: Last repeats the previous sale (F8), Hold parks this sale to serve the next customer, and Clear empties it.
Pieces, cartons and crates
A product with a carton, pack or crate size asks Retail / Single piece or Wholesale / Full pack when you add it. allshop.ng uses the right price and takes the right number of pieces from stock (3 cartons of 24 take 72 pieces). Set this up on the product: see Adding products.
Selling by the kg
Frozen fish, meat, rice and anything else sold by weight asks for the weight when you tap it. Put the goods on the scale and type what it shows, for example 1.35 (1,35 works too), or tap 0.5 kg, 1 kg, 2 kg or 5 kg. The price is worked out as you type, and the wholesale price per kg is used once the weight reaches the owner's minimum.
Tap Whole carton to sell a full carton at the carton price; the full carton weight leaves stock. The sale shows the kg on each line, and the receipt prints 1.35 kg x 3,200 / kg. A refund can give back part of the weight.
Cooking gas and "₦5,000 worth". Tap By amount (₦) and type what the customer wants to spend, or tap ₦1,000, ₦2,000, ₦5,000 or ₦10,000. The kg are worked out to the gram and rounded down, so the sale is never more than the customer's money: ₦5,000 at ₦1,200 a kg is 4.166 kg, ₦4,999.20. The quick sizes come from the product, for example 3, 5, 6 and 12.5 kg for gas (see Adding products).
Choosing the customer
Every sale starts as Walk-in customer. Tap it to pick a saved customer or add a new one. A customer is needed to sell on credit, and their purchases and points are kept on their page.
More tools
Bars also get Kitchen, Service charge and Wastage; shops that use pickup codes get Pickup code. Deposit records the deposit on crates and bottles and gives it back when they return. Update products fetches the latest products and prices to this till.
Taking payment
Cash with change worked out, transfer, card, credit and split payments, change owed and discounts.
The big Cash button (F2) and the Transfer (F3) and Card (F4) buttons finish the sale in one tap. More opens On credit and Split payment.
| Payment | What happens |
|---|---|
| Cash | Asks what the customer gave and shows the change. The cash counts in the open shift. |
| Transfer | Records a bank transfer or mobile money. Check the alert on your phone before you tap. |
| Card | Records a POS terminal payment. With a Moniepoint terminal set up, the amount is sent to the terminal and the sale finishes by itself when the customer pays. |
| On credit | The customer pays later. Pick the customer; the amount is added to what they owe (see Customers and debts). |
| Split payment | Part cash, part transfer, part card or credit. Type each part until nothing is left to pay. |
Change owed
If the customer is owed change you do not have, tap Record owed and add their name or phone. It goes into the change-owed ledger (⋯Change owed) with the receipt number and the cashier. When the customer comes back, find them there and mark it settled, in full or in part, so nobody is accused of keeping it.
Discounts
Open ⋯Discount to take a percentage or an amount off the sale. Cashiers can give up to the limit set in SettingsSellingSales and discount rules; anything above needs a manager's PIN.
Receipts and printing
Print on a thermal printer or any printer, share receipts as pictures, and show a customer screen.
Printing
- 1Choose the paperIn SettingsReceipts & printingPrinter setup pick 58 mm or 80 mm thermal paper, or A4. Printing through the phone's or computer's print screen needs no pairing.
- 2Connect a receipt printer (optional)On the Sell screen: ⋯ › Printer opens the printer centre. Tap Connect a Bluetooth printer (on Windows, a cable or COM port printer works too). allshop.ng reads the printer name and sets the right paper size for it.
- 3Print a testTap Print a test receipt in the printer centre. Words should be dark and nothing cut at the edges.
- 4Print every receipt by itself (optional)In the printer centre, turn on Print every receipt by itself.
The printer centre
Once a printer is connected, its state shows next to ⋯ on the Sell screen: Ready, Reconnecting or Bluetooth off. Tap it to open the printer centre; it also opens from SettingsReceipts & printingOpen printer centre.
- Reconnects by itself. When the printer is switched off, goes out of range or the phone sleeps, allshop.ng reconnects it as soon as it is back, with or without internet. Turn off Reconnect by itself if you prefer it to connect only while a receipt prints.
- Receipts wait when the printer is away. If a receipt could not reach the printer at all, it waits and prints when the printer is back (receipts from the last 3 minutes print by themselves; older ones wait for Print all now). A receipt that stopped part-way is never sent again by itself, so nothing prints twice: reprint it from Sales.
- Activity lists what happened: connected, went offline, printed. Help and troubleshooting has tips for Android, Windows and iPhone, and Copy details for support when you need help.
The receipt header, footer (your returns policy, for example), logo and whether to print a customer and an office copy are all in SettingsReceipts & printing.
Sharing a receipt
Open any sale in Sales and tap Share Image to send the receipt as a picture on WhatsApp, or Reprint to print it again.
Sales history and refunds
Every sale by day, cashier and payment, each receipt in full, and refunds that put stock back.
Pick the period at the top (Today, Yesterday, This week, Last 7 days, This month, Last month, or any dates). Search by product, receipt number or customer; filter by cashier and payment method, and by completed, refunded or voided sales.
Tap a name under Who sold to see only their sales, or a product under Best sellers to find every sale that had it. CSV and Download PDF export what is on the screen.
Refunds
Open the sale and tap Refund. Set how many of each item came back, the reason, and how the money goes back to the customer. Returned items go back into stock, the refund comes off that day's sales, and the audit log records who did it. A sale can be refunded in parts; the refunds so far show on the sale.
Tabs, tables and the kitchen screen
Keep orders open for tables, send dishes to the kitchen, and run the kitchen from a tablet or TV.
Bars and restaurants keep orders open while customers eat and drink. Set the shop type to Bar / Drinks Lounge in SettingsShop details to get tabs, the kitchen and service charge.
- 1Start a tabAdd the items, tap Hold and give it a name: a table, a room or the customer's name.
- 2Add to it laterTap the tab at the top of the Sell screen, add the next round, and hold it again.
- 3Send food to the kitchenDishes marked Send to kitchen on the product go to the kitchen screen when the tab is sent.
- 4SettleWhen the customer is ready to pay, open the tab and take payment as usual. A tab can be moved into another tab, and a bill can be split between people.
The kitchen screen
A full-screen board for a tablet or TV in the kitchen. Open it from Sell⋯Kitchen queueKitchen screen; chefs see it straight after signing in.
- A ticket turns amber after 10 minutes and red after 20, so nothing is forgotten.
- Tap Tap to allow sound once so the screen can ring for new orders; ⤢ makes it full screen.
- Orders from your QR menu arrive here too.
Shifts and the cash drawer
Open each till with a float, record cash in and out, and count the drawer at the close.
A shift is one till's cash drawer, from the moment it is opened with a float until the cash is counted at the close. Several cashiers can sell into one shift; each till has its own.
During the shift
- Cash in: money added to the drawer (more change from the bank).
- Cash out: money taken out (banked, or taken by the owner).
- Expense from drawer: fuel for the generator paid from the till; it also goes into Expenses.
Closing the shift
Tap Close shift, count the cash, and type what you counted. allshop.ng shows what was expected and the difference (short or over), and what each cashier sold and took in cash.
| Expected cash in the drawer = |
|---|
| Opening float + cash sales − cash refunds + cash in − cash out − expenses paid from the drawer |
Card, transfer, credit and online payments are listed by method but are not in the drawer. Shifts open, take cash in or out and close even without internet.
Products, deliveries, counts, suppliers and the tools for special shops.
Your products
The Inventory page: what you have, what it cost, what it earns, and what needs buying.
Search by name, barcode, SKU or category, or tap the camera to scan. Filter with Low stock, Out of stock and Expired, by category, and sort by name, stock, price or margin.
- On hand shows pieces, and cartons where the product has a carton size. The bar under it shows how close it is to the low-stock level.
- Margin is the profit as a share of the selling price, and the naira profit on each piece.
- Status: Healthy, Low stock, Out of stock, Expiring or Expired.
Adding and changing products
Scan, type or snap. Prices, quantities, cartons, wholesale prices, expiry dates and product options.
Tap Add product on the Inventory page. Choose how you want to add it.
- 1NameAs customers know it, with the size: Peak Milk Tin 400g. Scanning a known barcode fills the name for you.
- 2Selling price and cost priceThe cost is what you paid for one. Set the price from a profit % works out the selling price from the cost.
- 3QuantityHow many you have now. +6, +12, +24 and +100 add quickly. Turn off Count stock for things you never run out of, like services.
- 4Warn me when it is down toThe low-stock level for this product.
- 5Expiry dateFor anything that expires. Products near expiry show on the dashboard and can be blocked from sale once expired.
- 6Category and barcodeOpen it to set the category, the barcode and the SKU. No barcode on the pack? Tap No barcode on it? Make one for me, then print stickers (see Stock tools).
- 7Save productOr Save and add another to keep going.
Cartons, packs, crates and wholesale prices
In the form, set how many pieces are in a carton (or a crate of drinks) and the carton price. Turn on Sells wholesale to give a lower price from a minimum quantity, for example ₦285 each from 20 pieces. The till then asks piece or carton.
Products sold by the kg (frozen fish, meat, rice)
In general and wholesale shops, under Sold by, tap Weight (kg) (phone shops, pharmacies and bars do not see this choice). The price, the cost, the quantity and the low-stock warning are then all per kg, and stock is kept to the gram: 25.75 kg is 25.75 kg, not 25 pieces.
To sell whole cartons too, fill in Whole cartons right under the prices: the kg in one carton and the carton price. The line under them shows what the customer saves against the kg price, and the wholesale price per kg (the carton price divided by its kg) that big buyers get from half a carton. To change those, open Cartons and wholesale.
When stock arrives, count it the way it comes: with a carton size set, the quantity is in Cartons and Plus loose kg. Type 30 and 3.5 (3,5 works too), or tap +1, +5, +10 or +50. The line under it says what you are adding and what there will be, in cartons and in kg, so nobody needs a calculator. Tap kg to type plain kg instead. The stock history notes what was counted (30 cartons + 3.5 kg).
Quick sizes at the till sets the kg buttons the till shows for the product: 3, 5, 6, 12.5 for cooking gas, or 1, 5, 10, 25 for rice. Separate them with commas. Left empty, the till shows 0.5, 1, 2 and 5 kg. Gas you buy is added as kg, like any delivery.
The Inventory page shows each product sold by the kg in cartons first, 30 cartons + 7.9 kg, with 607.9 kg in all under it.
Products in sizes, colours or other options
Tick This product comes in options and type the options (Size: S, M, L; Colour: Red, Black). Each option gets its own stock, price, barcode and line in the reports, and the till shows a picker.
Changing a product
Tap the pencil on a product, or ⋯ › Edit product. Price changes are recorded in the audit log, and the owner can be told on Telegram.
Snap a delivery
Photograph a supplier's receipt and the goods go into stock, with the supplier's details, new products priced by mark-up, and duplicates caught.
Snap a delivery reads your supplier's receipt or invoice and adds the goods to stock for you. It is an add-on: the first time you open it, the app shows the price and lets you switch it on with Paystack.
- 1Open itInventoryAdd productSnap a delivery.
- 2Add the pagesUse the camera (on a phone it opens by itself) or Browse files for photos and PDF invoices. Up to 10 pages for one delivery; you can also drag files in or paste them on a computer. A blurred or dark photo is pointed out so you can take it again.
- 3Let it readPages are read a few at a time. It finds each line, the quantity and the cost, and the supplier's name, phone, address and email.
- 4Check the doubtful linesLines it is sure of (or that matched by barcode) are ready. The others come one card at a time: Yes, a choice among close products, or It is new. For a new product, pick the selling price by mark-up (+10% to +50%, your usual one first) and see the profit.
- 5Add to stockEvery line is saved once, with the cost, the price and the supplier. A new supplier is added to Suppliers by itself.
| It catches | So you do not |
|---|---|
| A receipt already added to stock | add the same delivery twice; it names it and waits until you say it is a different one |
| The same photo picked twice | count a page twice |
| A line photographed on two pages | add the same goods twice |
| A supplier you already have (by phone or name) | create a second copy of the supplier |
New stock, losses and stock counts
Record deliveries and losses, see the history of every product, and count the shelves without stopping sales.
Every change to stock is recorded with who did it, when and why: sales, refunds, deliveries, losses, corrections, counts and moves between shops.
New stock
Open the product and add the quantity that arrived, with the cost, the supplier, the invoice number and (for goods that expire) the batch and expiry date. Faster ways: Snap a delivery, or receive a purchase order.
Losses
Damaged, expired, stolen or used in the shop? Record Loss with the reason. Stock goes down, the cost of the loss comes off your profit, and the audit log keeps the record.
Stock count
- 1Start countingInventoryToolsStock count. allshop.ng copies today's stock.
- 2Count the shelvesYour team types what is really on the shelf, on any phone.
- 3ApproveA manager checks the differences and approves. Only the differences change the stock, so sales made during the count are kept.
Stock tools: stickers, moves, import and export
Barcode stickers for goods without one, moving stock between your shops, spreadsheets, and sorting products into categories.
Barcode stickers
For goods with no barcode (rice and beans by the cup, local soap, fabrics, anything you repack), give the product a barcode of its own and print stickers. Scanning the sticker at the till works like any other barcode.
Move stock to another shop
InventoryToolsMove stock to another shop. Choose the other shop, add products and how many, and tap Move stock. The same product in the other shop is found by barcode, SKU or name, or created there. Both shops get a line in their stock history. For the owner of both shops, or a manager of both.
Import and export (CSV)
Export CSV saves your whole list as a spreadsheet. Import CSV adds or updates products from one; stock in the file is the final count, not added on top. Importing your own export again updates the same products instead of making copies.
Sort my products
Products with no category? Sort my products suggests a category for each one. Check the suggestions and tap Accept. When three or more products have no category, Inventory offers it in a banner.
Suppliers and purchase orders
Keep your suppliers, send orders on WhatsApp, receive deliveries into stock and track what you owe.
Tap Add supplier and type the name, phone, email and address (or let Snap a delivery fill them from a receipt). Products can be linked to the supplier you usually buy them from, which feeds the buying advice in Reports.
Purchase orders
- 1New orderSuppliersPurchase ordersNew order. Choose the supplier and add products by search or scan, or tap Fill with what is low.
- 2SendSave and send writes the order out and opens WhatsApp to the supplier's number. You can also email or print it.
- 3Receive the deliveryWhen the goods arrive, open the order and tap Receive. Change any quantity that came short. The stock goes in by itself, with the cost.
- 4Pay the supplierRecord payments against the supplier. You owe shows what is still unpaid, and overdue orders show on the dashboard.
Pharmacy: drugs, batches and expiry
Generic names, classification, NAFDAC numbers, batches, expiry dates and shelf locations.
Set the shop type to Pharmacy / Drug Store and products get the details a pharmacy needs.
| Field | What it is for |
|---|---|
| Generic name | Search by generic name (Paracetamol, Amoxicillin) as well as brand. |
| Classification | OTC, prescription only (Rx), controlled, supplement or cosmetic. |
| Form and dosage | Tablet, capsule, syrup, sachet; 500mg. |
| Manufacturer and NAFDAC number | Printed on reports and kept for inspections. |
| Batch and expiry | Each delivery can be its own batch with its own expiry date; the oldest is sold first. |
| Shelf | Where to find it: A1, B3. |
- Products expiring within 30 days show on the dashboard; the Advisor lists stock at risk on the shelf.
- Turn on Block expired item sales in SettingsStock rules so an expired pack cannot be sold.
- Pharmacists get their own role with Sell, Inventory, Customers, Sales and Reports.
Phone screens: find the screen that fits
For phone repair and accessories shops: type a phone model and see the screens in stock that fit it.
For phone repair and accessories shops. A customer asks for a screen for their phone model; allshop.ng finds the screens in your stock that fit, using the supplier's own list of which screen fits which phone.
- Type the phone model in the usual Sell search (Tecno Spark 10, A13).
- Screens in stock that fit show next to your normal results. Add to sale adds one.
- Where one phone takes more than one version of a screen, Check screen version shows the parts so you can confirm the right one before adding it.
Missing match? Sell⋯Screen matching: a cashier reports it; the owner or an inventory editor reviews unmatched stock there and can remember this version for a stock item. Screen matching is switched on per shop by allshop.ng.
Bakery and kitchen production
Record what you make, load goods out with vendors, check in what comes back, and plan tomorrow.
For bakeries and kitchens that make what they sell and send it out with vendors or vans. Open Production and tap Switch on; it is included in the free trial.
- 1Record a batchWhat came out of the oven or kitchen today, and how many.
- 2Load outGoods going out with each vendor, van or keke, with their price.
- 3Check inAt closing, what came back and the money collected; allshop.ng shows who owes what.
- 4PlanThe plan for tomorrow from what sold, and the menu board.
The tabs: Today, On the road, Money, History, Plan, Menu board, How it's going, Setup and Guide. Nothing changes on your tills or menu until you record a batch or mark a dish ready.
Customers who owe, staff and what each one may do, and expenses.
Customers and debts
Everyone who buys from you, what they spend, what they owe, and reminders on WhatsApp.
Add a customer with Add customer, or while selling. Each customer keeps their purchases, spending, points and debts.
- 1Sell on creditAt the till, pick the customer and tap More › On credit (or use it in a split payment).
- 2RemindTap Send reminder. WhatsApp opens with a polite message and the amount.
- 3Record the repaymentWhen they pay, tap Record repayment, the amount and how they paid. Part payments are fine.
Staff, PINs and permissions
Add staff with their own PIN and role, and choose exactly what each person may do with stock.
- 1Add the personTap Add Staff, choose the role and give them a 4-digit PIN.
- 2Give them the shop codeThe code at the top of the Staff page (tap Copy). They sign in with the shop code and their PIN.
- 3Set what they may do with stockTap Stock access on the person, or use the table below.
| Permission | Means they can |
|---|---|
| Stock page | Open Inventory |
| Add products | Create new products |
| Edit products | Change names, prices and details |
| Add stock | Record deliveries and stock in |
| Reduce stock | Record losses and corrections that lower stock |
| Delete | Delete products |
| Cost prices | See cost prices and profit |
A change takes effect within a few minutes, or at once when the person signs in again. Reset PIN gives a forgotten PIN a new one; Disable stops someone who has left without losing their sales history.
Expenses
Record what the shop spends so your profit is real.
Record rent, electricity, diesel, salaries, transport and anything else the shop pays for. Reports take expenses off your profit to show what the shop really made.
Money paid straight from the till is better recorded as Expense from drawer on the Shifts screen, so the cash count still balances. It shows here too.
Dashboard, Command Centre, reports and the audit log.
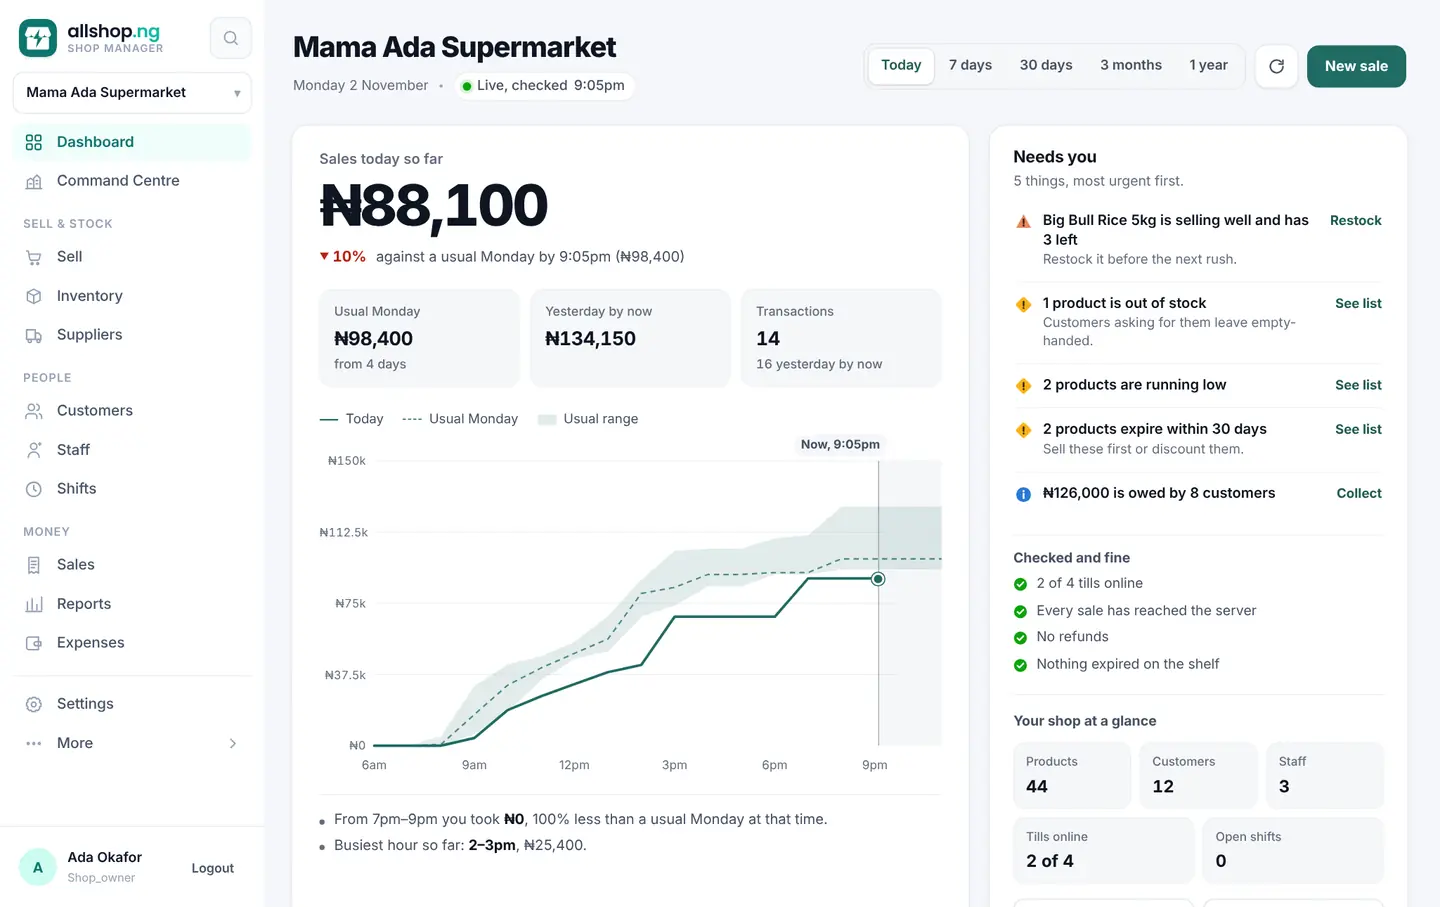
The Dashboard
Today against a usual day, and the things that need you, most urgent first.
- Sales today so far compared with the same weekday over the last four weeks, at the same time of day, so a slow morning is not mistaken for a bad day.
- Needs you: products selling well and about to run out, out of stock, running low, expiring within 30 days, and money owed by customers. Each has a button: Restock, See list, Collect.
- Checked and fine: tills online, every sale reached the server, no refunds, nothing expired on the shelf, no discounts above the cashier limit.
- Your shop at a glance: products, customers, staff, tills online and open shifts.
Change the period with Today, 7 days, 30 days, 3 months and 1 year. New sale opens the till.
Command Centre
All your shops on one screen, refreshed every minute.
For owners with one shop or many. It refreshes every minute and shows Today, Yesterday, 7 days, 30 days or This month. Top sellers ranks your staff by sales; Stock and money shows stock at cost, money owed by customers, refunds, discounts and products out of stock, running low or expiring, across every shop.
Reports and the Stock Advisor
Profit, stock, customers and staff, a 30-day forecast, and what to buy this week.
| Tab | What it answers |
|---|---|
| Overview | How is the business doing, and what deserves my attention now? |
| Advisor | What should I buy this week, what is at risk on the shelf, what is not selling, what should we count? |
| Intelligence | What will the next 30 days probably bring, and how sure is that? |
| Sales | Revenue, gross and net profit, margin, average sale, refunds, payment mix, the products that make 80% of sales, and the busiest hours. |
| Inventory | Stock that earns and stock that waits: ABC groups, sell-through, dead stock, fast movers needing stock, supplier-linked sales. |
| Finance | Profit and loss, cash and what you owe and are owed. |
| Customers | Who buys, how often they come back, and valuable customers who stopped coming. |
| Staff | What each person sold, profit, payment mix and the best staff of the month. |
| Records | How complete and trustworthy your records are. |
The Stock Advisor
Worked out from your own sales, deliveries and expiry dates. Buy list says how many of each to buy and what it will cost; Clear stock lists what to discount before it expires; Selling speed shows how fast each product sells.
Export at the top saves reports as PDF or CSV. For your accountant, see Your data and accountant.
The audit log
Who did what, and when.
Search by action, person or product, and filter by type. Use it when the stock or the cash does not add up: you can see exactly who changed what and when.
Your QR menu, pickup codes, payments and the poster that brings customers.
Share your QR poster
An HD poster in six styles, shared as a picture on WhatsApp or printed in A4.
- 1Open itSettings › QR menu & orders › Share QR poster. For one table, tap Share QR next to it. Your logo, name, address and phone are on it.
- 2Pick a styleTeal, Sunset, Royal, Forest, Berry or Night. The app remembers your choice.
- 3Edit the messageIt goes with the picture, with your menu link.
- 4Share or printShare poster (WhatsApp, Status, Instagram), Download HD, Print A4 or Copy link.
Every setting, offline selling, alerts, your accountant, security and billing.
A tour of Settings
Every setting, grouped by what it is for, with a search box.
Settings is grouped by what each setting is for. On a computer the groups are on the left; on a phone they scroll across the top. The search box at the top looks through every setting (try printer, bank or VAT).
| Group | What is in it |
|---|---|
| Shop details | Shop information, currency and display, shops and branches, bakery and kitchen |
| Selling | Sales and discount rules, shifts and opening hours, barcode and scanner, quick shortcuts, sounds, bar settings |
| Stock rules | Selling below zero, blocking expired items, costing method, low-stock levels |
| Receipts & printing | Printer setup and paper fit, receipt content, customer screen |
| Payments | Bank details, how customers pay on your menu, payment terminals |
| QR menu & orders | QR ordering menu, posters, table QR codes, pickup codes, delivery |
| Staff & access | Who may see costs, change prices and edit stock |
| Notifications | Telegram alerts, supplier restock emails, quiet hours |
| Devices & offline | Store Hub, tills and devices, storage on this device, app version |
| Integrations & data | QuickBooks, your data and accountant |
| Account & security | Your account, password, 2-step login, appearance |
Save each card with its own button, or Save all at the top. Test print prints a sample receipt.
Selling without internet, sync and the Store Hub
How the till keeps working offline, the Sync screen, and the Store Hub for shops with several tills.
allshop.ng keeps selling when the internet is down. Sales, receipts, stock, customers, tabs and shifts all work on the device, and everything is sent to allshop.ng when the internet comes back.
The Sync screen
Open it from MoreSync. In plain words says what happened, why and what to do. If something needs a person (for example a product deleted on another till while this one sold it), it is grouped by who can fix it.
Store Hub for shops with several tills
Install the Store Hub on one shop computer (Windows or Linux). Tills and phones on the shop's Wi-Fi or hotspot pair with it in SettingsDevices & offlineFind Store Hub. With the internet down, every till keeps selling against one shared stock count; the Hub sends everything to the cloud when the internet returns. It starts by itself when the computer restarts.
Telegram alerts and the stock bot
Shop alerts on your phone, and stock answers and restocking from Telegram.
- 1Open NotificationsSettingsNotifications, as the owner or a manager.
- 2Tap Connect with TelegramTelegram opens the allshop.ng bot with your code already filled in. No bot to create and nothing to copy.
- 3Press StartYour Telegram is linked to the shop and appears under Connected recipients.
- 4Choose the alertsOut of stock, expiry, price warnings, stock tampering, the daily closing summary, the weekly owner review and the new-month report.
| Send the bot | To get |
|---|---|
/stock | Products out of stock |
/lowstock | Products below their warning level |
/expired | Expired and soon-to-expire products |
/restock | Guided restocking: pick a product, type the quantity, confirm |
/search | Find a product and its stock |
/top, /recent, /profit | Best sellers, the latest sales, today's profit |
Your data, your accountant and QuickBooks
Files that balance every day, journals for QuickBooks, Xero or Sage, and every list as a spreadsheet.
Your data and accountant
Pick the dates (this month, last month, this year or any dates). The card shows sales, VAT, cost of goods, refunds, expenses and debts collected, and checks that every day balances. Download:
- Daily summary (CSV): one row a day with sales by payment method, tax, cost, profit, refunds and expenses.
- Journals for QuickBooks, Xero or Sage, with your own account names and codes.
- Download your data: every list the shop keeps (products, sales, items sold, refunds, customers, payments, expenses, suppliers, purchase orders, stock changes) as spreadsheets. It works even after a plan ends; your data is yours.
QuickBooks Online
Connect once in SettingsIntegrations & dataQuickBooks. Each day's figures then go to QuickBooks by themselves as one balanced journal entry a day.
Sign-in security and 2-step login
Protect your account with an authenticator app, and see every device signed in.
2-step login
- 1Install an authenticator appGoogle Authenticator or Microsoft Authenticator (Authy and 1Password work too).
- 2Turn it onSettingsAccount & securitySign-in & securityTurn on 2-step login. Scan the QR code with the app and type the 6-digit code.
- 3Keep your recovery codesWrite them down somewhere safe. Each one works once if you lose your phone.
- You can trust a device for 30 days so it does not ask every time.
- A sign-in from a new device sends you an email; owners hear when staff sign in on a new device.
- Signed-in devices lists every device on your account; sign any of them out.
Billing, plans and the free trial
Your plan, paying with Paystack, and what happens when a payment is late.
Every new shop gets 30 days free. Before the trial ends, pick a plan and pay with Paystack. Paying early adds the new month or year to the time you have left.
- Current plan: the plan, its state (Free trial, Active, Payment overdue, Expired) and when it renews.
- Next payment: the due date, the amount and Pay now.
- Payment history: every payment with its receipt reference.
After a payment is late there are a few days of grace; after that the shop locks until it is paid. Your data is kept, and the owner can still download it.
One free trial per business
Every item list carries the shop's export key and product IDs. When a new account on a free trial imports the list of another owner's shop that is not paying, the import is refused and that free trial stops; the account can subscribe at once. Lists from a paying shop (a branch, a sister business) come in as normal, and your own shops never count. If this happens by mistake, contact us and we will look at it.
Refer and Earn
Bring other shops to allshop.ng and earn every time they pay.
- 1Add your bank accountOnce. Paystack sends your earnings straight to it.
- 2Share your linkCopy link, WhatsApp, Share or show the QR code. Shops that sign up with it are yours.
- 3Earn when they payEach time a shop you brought pays its plan, you earn. After a 7-day check the money is paid to your bank.
Signing up alone earns nothing; you earn every time they pay, for as long as they stay. Marketers with a partner agreement see their fixed amount and its terms here.
Shortcuts, fixes for common problems and words used in the app.
Keyboard shortcuts
For cashiers at a computer.
| Key | On the Sell screen |
|---|---|
| F1 or / | Go to the search box |
| F2 | Pay with cash |
| F3 | Pay by transfer |
| F4 | Pay by card |
| F8 | Repeat the last sale |
| Esc | Clear the search, or close a window |
A barcode scanner types like a keyboard: scan into the search box, or anywhere on the Sell screen.
Troubleshooting
Common problems and what to do.
| Problem | What to do |
|---|---|
| "There is no internet connection" | Check the data or Wi-Fi. Sales and most changes are kept on the device and upload by themselves once the internet is back; the message says when something was not kept. |
| "Your account is not allowed to do this" | The owner gives access in Settings › Staff & access. Only the owner or a manager can change prices and stock levels by default. |
| "The server had a problem" | Wait a minute and try again. If it keeps happening, open Sync › Copy diagnostics and send it to us. |
| The receipt does not print | Tap the printer next to ⋯ on the Sell screen. The printer centre says what is wrong (switched off, Bluetooth off, needs a tap) and Reconnect now fixes most cases. A receipt that could not reach the printer waits and prints when it is back. |
| Words on the receipt are cut off | Choose the right paper width (58 or 80 mm) and print a test. Pairing the printer sets the size for you. |
| Sales made offline are not on the owner's phone | On the till, open Sync and tap Sync now once the internet is back. The amount waiting shows there. |
| A product I just added is not on another till | It arrives within a minute. In Inventory › Tools tap Sync from server to fetch it now. |
| A cashier cannot see Inventory | Give them Stock page in Settings › Staff & access, or a role that has it. |
| The till asks to open a shift | Require a shift before selling is on. Open the shift with the float, or turn it off in Settings › Selling. |
| The till says the plan needs renewing | The owner pays in Billing. Staff cannot pay and are not sent there; sales already on the device stay safe. |
| Telegram does not connect | Press Start in the bot, then check Connected recipients in Settings › Notifications. |
| No low-stock alert | Check the product's warning level, that Telegram is connected, and that the alert was not already sent for that product. |
| The QR menu says the shop is not taking orders | Turn on Enable public QR ordering and Save QR order. Check your opening hours in Settings › Selling. |
| I forgot my password | Forgot password? on the sign-in page. Staff ask the owner to Reset PIN. |
| Something else | Open Sync › Copy diagnostics and send it to us from the contact page. |
Glossary
Words used in the app.
| Word | Meaning |
|---|---|
| Float | The cash put in the drawer when a shift opens, for change. |
| Shift | One till's cash drawer from opening to the cash count at the close. |
| Tab / held order | An order kept open (a table, a room) until the customer pays. |
| Walk-in customer | A sale with no saved customer. |
| On credit | Sold now, paid later; the amount is added to what the customer owes. |
| Change owed | Change the shop could not give at the time, recorded on the sale. |
| Cost at sale | The cost of an item when it was sold, so old profits do not change when prices do. |
| Margin | Profit as a share of the selling price. |
| Low-stock level | The quantity at which a product counts as running low. |
| FEFO | First expiry, first out: the batch that expires first is sold first. |
| Stock count | Counting the shelves and correcting stock to what is really there. |
| Export key | Your shop's code in every item list it exports. |
| Store Hub | A shop computer that keeps tills in step with no internet. |
| Sync | Sending what was done on a device to allshop.ng, and fetching what changed. |
| Shop code | The short code staff type with their PIN to sign in. |
| PWA | The installed app: allshop.ng on your home screen, working offline. |
A to Z
Every feature in alphabetical order. A · B · C · D · E · F · G · H · I · K · L · M · N · O · P · Q · R · S · T · V · W
- 2-step login
- Accountant files
- Add product
- Advisor (what to buy)
- Audit log
- Bank details
- Bar and lounge
- Barcode for goods without one
- Barcode scanner
- Barcode stickers
- Batches and expiry
- Billing
- Branches and shops
- Card payments
- Cartons and crates
- Cash drawer
- Categories
- Change owed
- Command Centre
- Copy check
- Credit sales
- Customer screen
- Customers
- Dashboard
- Delivery orders
- Discounts
- Download your data
- Expenses
- Expired items
- Export CSV
- Forgot password
- Free trial
- Glossary
- Hold a sale
- Import CSV
- Install the app
- Inventory
- Keyboard shortcuts
- Kitchen screen
- Losses
- Low stock
- Moniepoint terminal
- Move stock between shops
- NAFDAC numbers
- Offline selling
- Paystack
- Permissions
- Pharmacy
- Phone screens
- Pickup codes
- PIN sign-in
- Poster
- Printer
- Product options (sizes, colours)
- Production (bakery)
- Purchase orders
- QR menu
- QuickBooks
- Receipts
- Refer and Earn
- Refunds
- Reports
- Roles
- Sales history
- Service charge
- Settings
- Shifts
- Sign up
- Snap a delivery
- Sort my products
- Split payment
- Staff
- Stock count
- Store Hub
- Suppliers
- Sync
- Table QR codes
- Tabs
- Telegram
- Transfer payments
- Troubleshooting
- VAT
- WhatsApp reminders
- Wholesale prices
You are ready
Open the app, sell something, and come back to any chapter when you need it. Stuck? Write to us from the contact page and say which chapter you were on.
Start free for 30 daysContact us